How to Insulate a Pitched Roof with Mineral Wool
By Mark Row
Mineral wool installation instructions
Pitched roof insulation is more a necessity rather than choice. The roof of the building is most exposed structural element to external influences. It is also an element through which a large amount of thermal energy is transferred if not insulated properly. So it is very important that the roof is well thermally insulated in order to stop heat escaping or cold from entering the building in winter, and vice versa in summer. Insulating a pitched roof with mineral wool is a very economical and environmentally efficient decision, because it significantly decreases heating and cooling bills and reduces the greenhouse gas emissions into the atmosphere.
Insulating between and below the rafters procedure
1. The roof must be thoroughly prepared before you can start insulating. This means that the roof covering and the ventilation channel are all in place, and a protective vapor - waterproof barrier is fixed directly to OSB or plywood sheathing, or on rafters, depending on whether timber sarking is used or not.
Important Notice - There are many types of roofs and a number of insulation positions, the example before you is not the universal model of pitched roof insulation, but it is a more common one. Assess the roof structure and find the appropriate insulating method for you (above, between, under the rafters or a combination of these) before you start insulating.
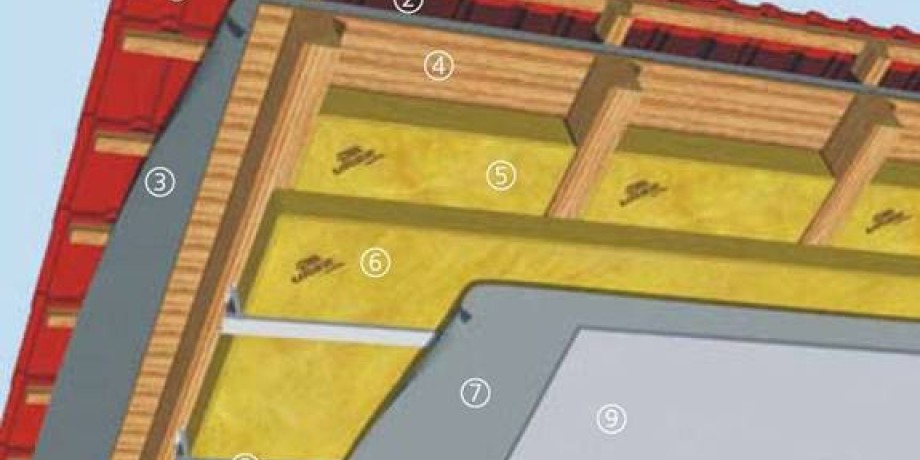
In this example secondary cover (vapor - waterproof barrier) is fixed directly on rafters, and in the image shown at the bottom of the page the secondary cover is fixed on timber sarking boards (Photo 1, 2).


2. Measure the space between the rafters and cut the insulation to the size. Be sure to use a wooden panel or something similar as a base for the wool rolls or slabs, so you can cut them safely without the risk of damaging your tools or the floor (Photo 3, 4). Always leave 1 or 2cm on each side for a better and tighter fit between the rafters.
The thickness of the insulating layers always depend on the particular location and structure of the roof, as well as the building codes and standards. You may find yourself in a situation where the rafters are not thick enough and the space between them is not deep enough to accommodate the required thickness of the insulation material, and you have to add battens to the face of the rafters in order to get the desired depth.
If you are not sure what to do ask the professionals for advice, usually you can get a good answer and free quotes from expert forums like InsulationForum.co.uk. The rule of thumb is to fill the whole void with insulation and cover the entire width of the rafters (Photo 5).


3. Single layer cladding system with metal framing in a form of metal brackets and Knauf ‘C’ Channels are fixed on the face of the rafters. You can use wood frames as well but there are a few advantages in using Knauf precision engineered metal sections. Between the ‘C’ channals insert another layer of insulation (Photo 6).

4. Place a DuPont Tyvek Housewrap Breather Membrane vapor barrier over the ‘C’ Studs and fix it on them using a heavy duty staple gun (Photo 7). All joints between a vapor barrier and the walls and all overlapping layers must be securely fastened, usually stapled or taped, in order to keep them in place before the plasterboards are installed over the vapor barrier (Photo 8).


Proper pitched roof insulation can be undertaken as a DIY project, but with strict adherence to building regulations and safety measures. Plan ahead and ask for advice whenever you are unsure how to properly handle a situation. Some professional builders can give you a free quotation and, if you ask nicely, their opinion on the matter.
1 cover (tiles/slates)
2 air channel
3 secondary cover (vapor - waterproof barrier)
4 sarking boards
5 thermal insulation layer between the rafters
6 thermal insulation layer under the rafters
7 vapor barrier
8 framing substructure
9 interior lining

If you found this article to be helpful, please share it with your friends on Twitter, Facebook and Google+. If you have any questions or comments feel free to write them in the comment section below, I will respond to all of them.


