External Wall Insulation on a Cavity Wall
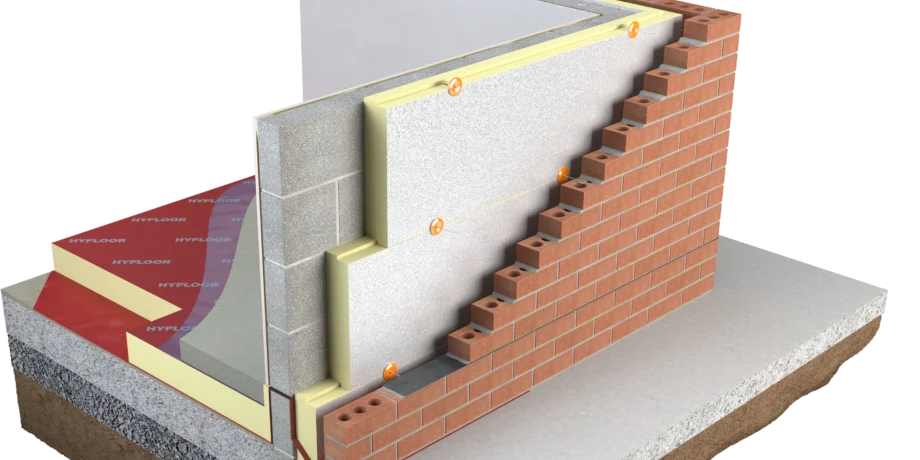
External Wall Insulation on a Cavity Wall
With much housing being older stock, the question comes up as to how to better insulate our homes.
One way would be to insulate the interior walls of the house. If this is possible, it is a good efficient and cost-effective way. However, most homes are not very large and we do not want to take away crucial interior space.
So more and more, people are looking at exterior insulations, which add thickness to the walls on the outside rather than the interior.
On solid walls, this is a relatively simple procedure. There are many companies and products that you can use to add the exterior insulation. Most common insulation types are:
- Phenolic (Kooltherm K5 Kingspan)
- Rock Wool Slabs
- Expanded Polystyrene (EPS)
- Extruded Polystyrene (XPS) – below the DPC level
They provide an effective continuous insulation layer that reduces thermal bridging.
But if you are insulating walls that are common and/or close to neighbouring properties, such as side Party Walls, then the insulation must be classified as ‘Class 0’ as to minimize the chances of fire spread. This is usually done through ‘Mineral Wool’ type insulation and not rigid insulation which can burn fairly easy.
(For more information on Class 0 ratings, refer to the UK Building Regulations Approved Document Part B (Parts 1 and 2) for Fire Safety Within and Around Buildings.)
If your property is a more modern build, then it may have cavity walls, whereby there is an air space in the middle area of the external wall construction. These air spaces were designed to allow air flow (ventilation) through the wall to reduce condensation and avoid interior dampness.
As a first point of departure on your insulation project and to best choose the best materials and installation proposals, it is recommended to ascertain the condition and size of your existing cavity and the material construction buildup of your existing wall.
By adding external wall insulation, then the outer layers of the wall construction now become insulated and warm, thus it is not desirable to leave this air space as an empty void. It means that this air space will be cold and possibly accumulate dampness as the openings for this air space, usually achieved through weep hole at the bottom of the air space void and up at the eaves (underside roof) level, may get blocked up with the internal insulation.
So, it is best to fill this void to reduce ‘thermal bridging’ (cold spots in the wall construction). The most common way is to blow or spray in insulation. This has to be done carefully as to fill all areas of the air space and not to leave areas, even small, not fully filled areas with insulation that may lead to future problems. It is best to check that you have a reliable and experienced installer/builder. The last thing that you want is moisture build up in the wall which can be caused by poorly built or added insulation within the cavity.
If your building’s cavity walls are already filled– make sure it’s a full fill insulation and inspect it to check its condition.
Certain wall types or climatic areas may benefit from adding a vapour barrier, if there is not one already within your current wall construction. A vapour barrier is usually placed on the warm side of the most inner layer (face) of the insulation. The vapour barrier has to be installed carefully with all joints overlapped and sealed properly (including fixing heads).
Steps that are usually involved in adding external insulation include:
- Ensuring that the existing external walls are clean and in good condition (repairing any faults, loose debris and cracks in the wall) to receive the new layer exterior layer of insulation
- To fix the insulation securely to the wall, following the manufacturer’s recommendations in regard to using mechanical fixings or appropriate adhesives
- Joints between insulation boards should be taped and sealed (ex. with expandable foam sealant) to prevent air leakage
- Finish the exterior wall face with render (Silicone, Acrylic, Silicate or Mineral), brick or an appropriate cladding (siding) material. An appropriate finish is crucial to protect the insulation and prevent rain moisture from entering into the wall construction
- Any penetrations through the wall such as windows, doors, ducts, vents and pipes, etc. are properly sealed and insulated to avoid thermal bridging
Before commencing the work, check with your local town hall or city council whether this work will require formal permission and planning permissions / building permits.
In some cases, Building Control (in the UK) will also have to be sought, applied for and approved in advance of starting the works, to ensure that the new insulation will meet the current thermal regulations and u-value for the overall wall construction.
For best results: consult a building professional such as an architect, thermal engineer (building energy specialist), insulation professional contractor (builder) who can prepare an appropriate ‘plan of action’ to make sure that the works are done correctly, to maximize thermal (energy) performance, durability and avoid potential moisture issues.
Common analysis usually involves calculating the U-value of the proposed wall construction build-up and in some instances an SAP test for an analysis of the whole house may be required.
There are many insulated render systems on the market – get a quote for the one we sell - Ceresit

